Showing posts with label fairytale. Show all posts

Sunday, June 10, 2012

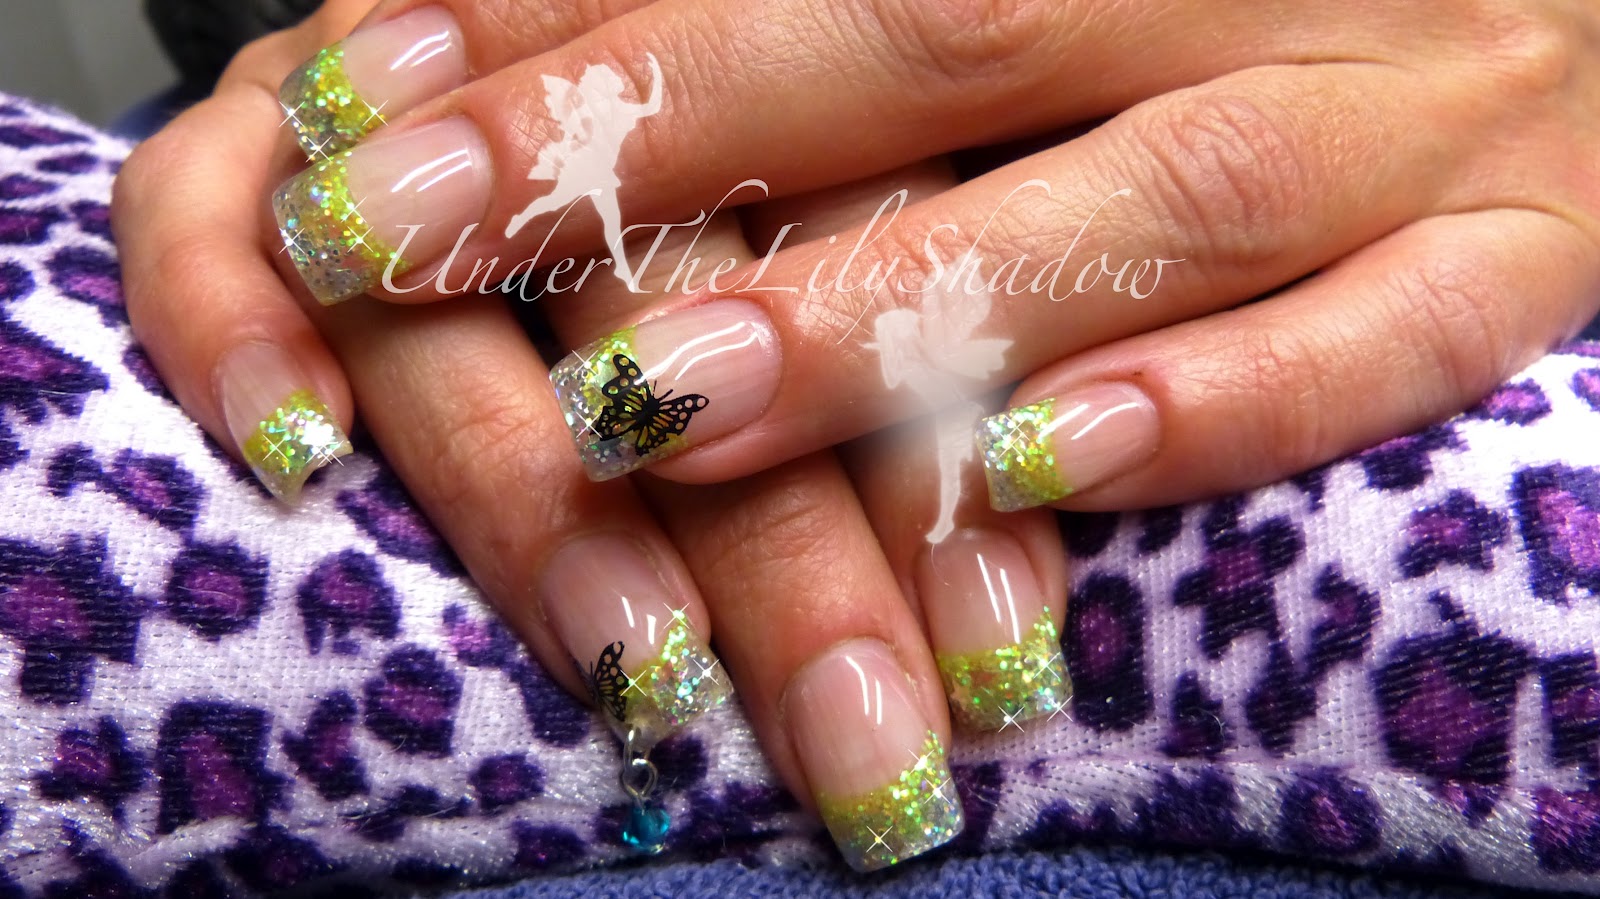
Enchanted Forest


I have already removed the previous design and prepped the nails prior to this video.

So let's get started.


In the video I start off by spraying the fingernails with IBD prep and I wipe it off with a lint free wipe. This removes any excess dust and oils from the nailplate to promote better bonding.

With NSI superbond primer, I prime the new nail growth.

Then I start forming the free edge with a silver mix that contains silver stars.
(I did not make it myself, I got it as a gift)
Above that silver, I place a very bright green color and form the smile line, fading the green down.
While the acrylic is still wet, I place a few iridescent stars on the green.

Then I go in with a second coat of NSI superbond primer, again, on the new nail growth only.

With NSI attraction Liquid and totally clear powder, I place a ball right behind the smile line, pat it from side to side and fade it down.
I put another ball right above the previous one and did the same.
To make sure the design on the free edge is completely encapsulated, I placed a small ball on the free edge as well, patted that from side to side and faded it up.
I did this to all 10 nails.

When all 10 were dry, I filed and shaped the nails how ever I wanted it, 
let my friend wash her hands (to get rid of any dust) and put some stamps on ringfinger and thumb.
With NSI Glaze 'n Go, I gave the nails a high gloss finish. This has to be cured for 2-3 minutes.
With cuticle oil, I conditioned the cuticles and last minute we decided to add a dangle.

Because it was late at night and the sun was set, I couldn't really take great picture or make a color-accurate end result.
But I did my best to find the best lighting available, and you can clearly see the difference.

I hope you enjoyed my little tutorial.


Wednesday, March 7, 2012

☆★ Witches Brew★☆


Witches Brew seemed a great name for these gel nails.
With the black and silver, thought it would be fun.

I already removed the old design and pushed back cuticles and all that good stuff, the nails were prepped and ready to go.


So in the video I start off by dehydrating the nails, with IBD prep and a lint free wipe.

Then I take my primer, wipe the excess on a paper towel and put it on the natural nail only.
The primer I am using is from IBD "natural nail primer"

Then I take IBD bonder and dab some on every nail, then I take a synthetic brush and brush it on the nail in a up and down motion(rubbing it in)
Let that cure in the U.V. light for 1 minute.

Then I take IBD builder gel in clear and put down a base layer on every nail, and then I go around the cuticle area with a rosewood stick.
Let that cure for 2 minutes.

Then I take a bit of IBD builder gel in clear and put that on the free edge.
I did not use a lot.
 I put some glitter in a tray and then with a brush I start patting the silver holo glitter onto the nail, going into the glitter on the nail, back in the glitter,  back on the nail.
Then I take a clean brush and start putting the black glitter on the smile line area.
With a clean brush I perfect my smile line, and once I'm happy with how it looks, I let that cure for 1-2 minutes to make sure the glitter isn't going anywhere and is locked in place.

When all 10 fingers are done, I get a bit of IBD builder gel in clear and put down a thin layer of gel.
Then I dip my brush into the gel to make a nice string.
With that string I start to wiggle left to right on the nail.
That is how I like to build the nail.
As you'll see in the video, the gel self levels and leaves a smooth surface.
Once I got the desired shape and thickness I go around the cuticle area with my rosewood stick and let that cure for at least 3 minutes just to make sure the gel has completely cured.
(if gel is not cured long enough, it can peel away from the nail and starts to lift)

When every nail is done I take none acetone nailpolish remover onto a lint free wipe and take away the tacky layer of the gel.
Then I file the sidewalls and the free edge, remove the dust and apply some nail polish.
I used "glosser" by ORLY

When the nail polish is dry I apply some cuticle oil and rub that in.
Take pictures and you are done :)


Wednesday, January 25, 2012

☆★ Fairytale GEL nails ★☆

Gel

Some one had asked me to do a gel tutorial on the fairytale nails.

So here it goes.

In the video 
I start off by applying a base layer of gel

Let that cure for about 2 minutes.

then I go in with clear builder gel and apply a thin layer to the free edge.
Clear of your brush(i used 3 brushes here) and pick up your first colored glitter and apply that on the nail, using a patting motion.
Dip, pat, dip, pat, dip pat (or else you are going to gel a huge mess)
then clear off your brush and go in with the second color, in my case purple.
dip, pat, dip, pat, dip, pat.

Form your smile line, and then cure for 2 minutes.

The next step is fairly simple, apply a thin layer to the free edge over the glitter and add your circles, cure for a minute or so (to lock the circles in place)

Then do a thin layer of clear builder gel on the entire nail, and start building your nail.
I use the string technique.
Once you are happy with the thickness and shape, cure for at least 2 minutes (I usually let it cure for at least 3 minutes, especially the thumbnail)

Then take a wipe and soak it with nail polish remover to remove the tacky layer.

File the free edge and sidewalls, and apply your favorite topcoat and you are done.

You can file and shape the nail like you would with acrylic, but with the technique I use, I rarely have to do that because the gel is smooth already.

Products used:
*IBD builder gel pink
*IBD builder gel clear
*uv gel brush
*holo glitter in purple and silver
*nail polish remover
*cotton wipe
*paper towel

I hope this was useful and thank you for reading
gel

gel


Tuesday, January 17, 2012

☆★Acrylic fairytale nails★☆


For the nails I used the reverse technique.
First I prepped my nails, filled in the new growth with acrylic powder and carved out the smile line and free edge.


In the video, first I take the holographic silver glitter (mixed with clear acrylic powder)
and place it on the free edge.
Then I took a circular shiny nail art piece and placed it on the silver while it was still wet so that it is secured into place when it dries.

For the next step I take a holographic purple glitter (mixed with clear acrylic powder)
and pushed it against the smile line and fading it out towards the tip.
I also put circular nail art pieces and placed it randomly on the wet purple glitter.

Then I used clear acrylic to encapsulate the design and build up the thickness of the nail.

When you are done, let the nails fully dry, and then file and buff to the desired shape.

Remove any dust, and at this point you can wash your hands with soap and a nailbrush to get rid of any dust and other chemicals that are still on your skin.

I did not show this step because this is a nail on a stick.

Take your favorite topcoat and make your nails shine.
If you used a gel sealer, cure for at least 2 minutes.

Use some cuticle oil to take care of your cuticles and you are done.

Products used in the video:
NSI attraction - Purely Pink Masque
NSI attraction - Totally Clear
Holographic purple and silver glitter
NSI Glaze 'n Go
9watt U.V. lamp
Circular shiny nail art pieces


No. 8 acrylic brush