Showing posts with label step by step. Show all posts

Saturday, October 26, 2013

Classy medallion nails

Don't we all love those beautiful 3D acrylic designs? But you have gel nails? You think you can't have some of that? Guess again ladies! Having some 3D acrylic art on your gel nails is easy. You still have the benefits of your gel nails but now also the benefits of 3D art. It is really easy. Let's have a look.


After prep and prime, apply a thin base layer on all 5 nails, one hand at a time. Go around the cuticles with a rose woodstick and let it cure for 2 minutes.

Apply a thin layer of clear gel on the free edge. This is the layer your glitter will adhere to. With a clean gel brush, apply the glitter on the nails. Wipe your brush between a paper towel to remove all the glitter and clean up your smile line. If you have 2 gel brushes, you can use one for patting the glitter on and one for cleaning up the smile line and for the whole gel application. After cleaning up the smile line, let it cure for 2 minutes.

Doing one nail at a time now, I apply a thin layer of builder gel clear on the entire nail. First the nailbed and last the glitter. Otherwise you will have glitter transferring onto your nailbed. After doing so, I am using the string technique to "build" the thickness of the nail. Go around the cuticle and let it cure for 3 minutes.

When all the nails are fully cured, I remove the tacky layer with none acetone nail polish remover and a lint free wipe. I also reshape the sidewalls and free edge.

Wherever you decide to do acrylic art is where you need to remove the shine of the gel nail. Acrylic needs those tiny scratches to adhere to. It has a tendency to pop off from something smooth and shiny and we want our art to last long. Make sure the nail is dust free.
Using NSI attraction radiant white, the same brand monomer and an acrylic brush, I picked up a medium size ball to create a circle shape on the nail. Keep patting the acrylic in place while it sets. When it's dry I used a stamp to create the zebra print.
I brush on a coat of Glaze 'n go on the entire nail and also on top of the medallion. Don't cure just yet, we need that coat to put our tiny pearls in. Just pick them up with a rosewood stick dipped in a bit of Glaze 'n go and arrange them around the medallion. Let it then cure for 3 minutes. Finish off the rest of the nails with a clear topcoat.

Friday, October 25, 2013

Ruby red nails

Here is a step by step on how to do these gorgeous Ruby red glitter nails with silver nuggets.


Wednesday, October 23, 2013

Gel overlay

Sometimes we don't want a french nail, bling or a complex design. Sometimes we want it simple. A gel overlay is great to give strength, it's a good base for nail polish and it has an amazing shine.


This woman still has her uv polish from 2 weeks ago. It's grown out quite a bit. So I am going to be removing the color, but not the existing gel that is underneath. I am going to use that existing gel in my advantage so that I don't need to add that much more later on when I fill the nails.

As with any nail service, I push back the cuticles.
Removing the color by simply filing it off with a 180 grit file. Also reshape the free edge and if needed make them shorter. If for some reason there is a bit of lifting near the cuticle, also remove that. Also removing the shine of the new nail growth for better adhesion.
I removed all the dust and sprayed the nails with IBD prep, this will dehydrate the nail and get rid of any oils on the nail bed.

With NSI superbond, I prime her natural nail only.
I applied a thin layer of IBD builder gel clear to the entire nail. Then I fill in the nails with the string technique . I went around the cuticle area with a rosewood stick and let it cure for 3 minutes. Repeat on all the nails.

I removed the tacky layer with a lint free wipe and none acetone nail polish remover, reshaped the side walls and free edge and applied a high gloss topcoat. And as always, use some cuticle oil to finish off your service.

If doing a gel overlay on a natural nail, the steps are as followed: push back cuticles, remove shine from natural nail, prep and prime, coat of clear gel with strings, cure, remove tacky layer, reshape side walls and free edge, clear nail polish and finish.

This overlay can be left like this, or you can apply nailpolish, which will last you for weeks without chipping.

Monday, September 17, 2012

mermaid nails and toes


Mermaids have always been one of my favorite mystical creatures. They were always described as mesmerizing, long hair, beautiful tails and their scales would shine in the moonlight.

Now I love bling and I love mermaids so lets do some nails!

Turquoise and purple are the main colors I am working with on the fingernails.

One the fingernails, the old design has been removed and the nails are prepped.

I picked up a ball of NSI attraction totally clear and I dipped it in the Turquoise hexagons.
I placed that ball on the nail and I start working with it to distribute the product from side to side and fading it up towards the cuticles.

When it is time to encapsulate, I did another coat of primer (NSI superbond) and picked up a ball of NSI totally clear and placed it at the cuticle area, patting the product into place, stroking it toward the free edge.
I placed another small ball at the free edge and feathered it up.

This step was the same for all 10 nails.

After filing and buffing, I let my friend wash her hands to remove all the chemical residue.

I brushed on a bit of NSI Glaze 'n Go on the ringfinger and I placed down some Turquoise hexagons in a half circle at the cuticle to give it that extra touch. Let it cure for a couple seconds to lock it in place.

Finish all the nails off with a nice coat of Glaze 'n go, cure for 3 minutes and you are done.


Now for the toes, I used gel and nail polish. Less hassle, but the same result.
Nails are prepped with a coat of IBD natural nail primer.

With a gel brush and IBD builder gel clear I brushed on a thin layer on all 5 toenails, went around the cuticles with a rosewood stick and let it cure for 3 minutes.
This gel layer acts as a super duper long lasting base layer, and not as strength. Toenails generally don't need strength, but the nail polish tend to not last that long.
So instead of a nail polish base coat, I used gel.

After curing, I cleansed the nails with none acetone nail polish remover.

I painted the toenails with China Glaze - 553 Sexy in the city.
Let that dry for a bit and went in with a second coat.

With an old nail polish brush I picked up some of the nail art dust mixer.
This dust mixer a lot more liquid than clear nail polish, therefor making it a lot easier to pick up nail art and blend it all out before it dries out, making it smooth and even.

So with the nail polish brush I dipped in the hexagons and brushed it on the nails, fading it up.
I added more when needed.

I finished off with Orly glosser.
These toenails lasted for 7-ish weeks before they were too long and needed to be redone.

Gel as a base layer makes your nailpolish :
*last longer
*stay on without chipping
*dry a lot faster
*don't stain the nails

Sunday, May 27, 2012

How to do nails on a nailbiter


Why do people bite their nails?
Are they nervous?
Are they scared?
Is it a habit or does it taste good?

All I know is, it doesn't look nice.
Woman's nails are our business card and also shows how well we take care after ourselves.
We can enhance the way our nails look, even with a simple french look.

Whether you use tips, a form or on their own nails, that is up to you and your client.

I am going to do gel nails on her own natural nails, because she asked for it.
If I was to elongate her nails, I would have personally used her own skin as a form.
(her skin is slightly higher than her nails, so putting a form "underneath" her nail won't work, and a tip is too big)

As always start with sanitizing and prep


In the video, I sprayed her hands with IBD prep, this sanitizes her fingers.
I pushed back her cuticles and trimmed off the excess.
(nail biters are more likely to have a larger cuticle growth)

With a 100/180 grit file, I used the 180 side to take away the shine of the natural nail.

When all 10 are done, I removed the dust with a kabuki brush, sprayed her nails with IBD prep and wiped her nails with a lint free wipe. This removes any excess dust and oils and also dehydrates.

In the video I only showed one coat of NSI superbond primer, but I applied 2 coats to promote optimal bonding.

Then with IBD builder gel clear and a gel brush, I brushed on a thin coat.
Nail biters have super tiny nailbeds, so it is best not to use a large brush.
With a rosewood stick I went around the cuticle and sidewalls.
I let that cure for 2 minutes.

With a dotting tool and Jean Marin builder gel white, I start forming her free edge.
I only take a small amount of gel on the dotter and add more when it is needed.
We can't go too thick or else the nail will look unnatural when it is finished.
Don't worry if you touch her skin with gel, just clean it with a rosewood stick.
It is inevitable to make a mess.
Remember: The end result is what counts.

Keep the free edge thin, do not go over 1/3 of the nail or else it won't look good.
(1/3 white, 2/3pink)
With a clean gel brush I cleaned up the smile line and let that cure for 2 minutes.

After all 10 are done, I brushed on a thin layer of IBD builder gel clear with a clean gel brush.
Then with short strings of gel, I build up the nail to get an even and smooth surface.
I went around the cuticle and side walls with a rosewood stick and let that cure for 3 minutes.

When all 10 are done, I removed the tacky layer with non-acetone nailpolish remover and a lint free wipe.

With my file I clean up the sidewalls and free edge.
Removed dust and applied Orly Glosser
(high gloss nail polish)

With cuticle oil, I pampered the cuticles.

Took some pictures and finish!


Sunday, May 6, 2012

Nicki Minaj Nail Art


My lovely mom never really went all out with her nails, but lately I can convince her to go a bit more wild and colorful.
And I sure do take advantage of that.


In the videoI start off by pushing back her cuticles for then to remove her old design with a drill and file. I also took away the shine of the natural nail.
When all 10 are done, I dust off the nails and hands. With a nailwipe and IBD prep I dehydrate the nails and that also removes any excess dust and oils.

Then I primed the nails with NSI superbond, because my mom is prone to lifting.
With a gel brush, I brush on a layer of IBD builder gel clear and go around the cuticles with a rosewood stick and let that cure for 2 minutes.

With the same gel, I brushed on a thing layer on the free edge only(except the ringfinger) and put some neon-ish pink on it. With a clean brush I cleaned up the smile line, and let that cure for about 2 minutes.

On her ringfinger I put a layer of gel on the entire nail because I was planning on doing a two color fade, but my mom loved the way it looked with just the purple glitter. Anyways, I let that cure for about 2 minutes.

Then I brush on a thin layer of gel and then did the string technique to fill up and build up the nail, going around the cuticles with a rosewood stick, then letting it cure for 3 minutes.
(This process needs to be done, ONE finger at a time, or else your gel will run off the nail, leaving a complete mess, so when one hand is in the UV lamp, you can work on the other.)

With a nail wipe and nailpolish remover, I removed the tacky layer, and with a file I filed the sidewalls and the free edge.

In the nail of her ringfinger on her left hand, I drilled a hole with a Nail piercer, and then I put on some ORLY Glosser, which is a clear nail polish.
When that was completely dry, I put in the handmade Swarovski dangle.
Then some cuticle oil and some pictures and I'm done.

I hope you like this design.
X


Tuesday, May 1, 2012

Glitter Toes - Dragonfly


Summer is on it's way and what better way to celebrate that with sparkly toe nails!

As always I start clean and disinfect my tools and nails.
Prep has already been done prior to filming.


In the video I start off by dehydrating the nails with IBD prep, this also removes any excess dust.
Then I prime the natural nail and go ahead with my first coat of IBD builder gel in clear.
I let that cure for 2 minutes.

Then I brush on a thin layer of clear gel and start patting on neon pink glitter, for then to fade it with blue glitter, letting that cure for about 2 minutes.

When all 10 toenails are done, I go ahead with my last coat of gel, so I brush on a thin layer and then I smooth out the surface.
The nails don't need to be thick, just smooth.
And I let that cure for at least 2 minutes.
I removed tacky layer with non-acetone nailpolish remover and filed the sidewalls and free edge.

Then I did some stamping nail art on the big toes, put some clear nail polish on all 10 and let that dry.
When dry, I put on some cuticle oil to the cuticles and took some pictures.

I hope you like the design, and getting in the mood for summer! Joy!!


Friday, April 20, 2012

☆★Gel Nails - Butterfly on ice ☆★


To achieve this design, I already removed the old design simply by filing it off with a 100/180 grit file.
And I have pushed back the cuticles and removed the shine from the natural nail.

In the video  I start off by dehydrating the nail with IBD prep and a lint free wipe, which also removes any excess dust and oils left onto the nail plate (which can cause lifting).

When that has dried, I applied NSI superbond (my mother is prone to lifting) on her natural nail only.
Then with my gel brush I brush on a thin coat of IBD builder gel in clear, as a base layer.
Went around the cuticles with a rosewood stick.
Cure that for 2 minutes.

With Jean Marin builder gel in Ultra white and a dotting tool, I start forming a smile line, for then to fill in the rest. With my gel brush, I clean up the smile line.
Letting that cure for 2 minutes.

Then I brushed on a bit of that clear gel on the free edge, for then to pick up a bit of blue glitter, to place that on the smile line, fading it a bit down toward the tip of the nail.
Letting that cure for just a minute.

Then it is time to build up the thickness and strength, and I do that by first brushing on a thin layer of IBD builder gel clear, and then building up the nail with strings of gel.
I go around the cuticle area with a rosewood stick and letting that cure for 3 minutes.

When all 10 nails are done, I remove the tacky layer with non acetone nail polish remover and a lint free wipe.
With a 180 grit file I file the sidewalls and the free edge.
Removed dust and stamped on a butterfly design.

To finish the nail off I used ORLY Glosser (careful not to smudge the stamp I just did)
Last but not least I rubbed on some cuticle oil and took some pictures.

I hope you like this design.
x


Friday, March 2, 2012

☆★ French gel nails ★☆


There is nothing like a good old french nail

In this video (not available yet) I start off by sanitizing and pushing back the cuticles.
With a 100/180 file I take off the old gel, but I leave a thin layer of clear gel on the nail.
Once the old gel has been removed I take away the shine of the natural nail.

Then I dust off, and spray them with IBD prep, and wipe it with a lint free wipe.
Then I take my primer and drain the access on a paper towel and put it on the natural nail only.

Then I take my clear builder gel and take a bit on my brush and brush it on the nails.
With a rosewood stick I go around the cuticles and in the sidewalls to make sure there is no gel run into it.
And I let that cure for 2 minutes (or till you other hand is done as well)

Then I took some of my new white gel on a dotting tool and start forming the smile line
(this gel was a bit more runny and did not cover well when brushing it on)
I am not pleased at all with this white gel, but for the sake of the video I continued to show how you use a white gel that has a runny consistency 
(the reason I'm not pleased with it is: It does not self level
 and needs too much manipulation to have a nice look)
Then I go in with my brush and perfect the smile line.

I let that cure for 2 minutes 

Then with my clear builder gel I brush a layer on the nail, and then I pick up a string and start building the nail.
Once I am pleased with the thickness and shape, I go around the cuticle and sidewalls with my rosewood stick and let that cure for at least 3 minutes.

Once every finger is done and fully cured, I take a wipe with nailpolish remover and clean off the tacky layer.
With my file I go around the free edge and sidewalls to make sure there are no sharp edges.
Then I use a clear nailpolish and when that's dry I put on some cuticle oil,
DONE

Products used:
* IBD prep
* IBD clear builder gel
* Jean Marin builder gel ultra white
* non acetone nail polish remover
*ORLY glosser
* cuticle oil


Monday, October 31, 2011

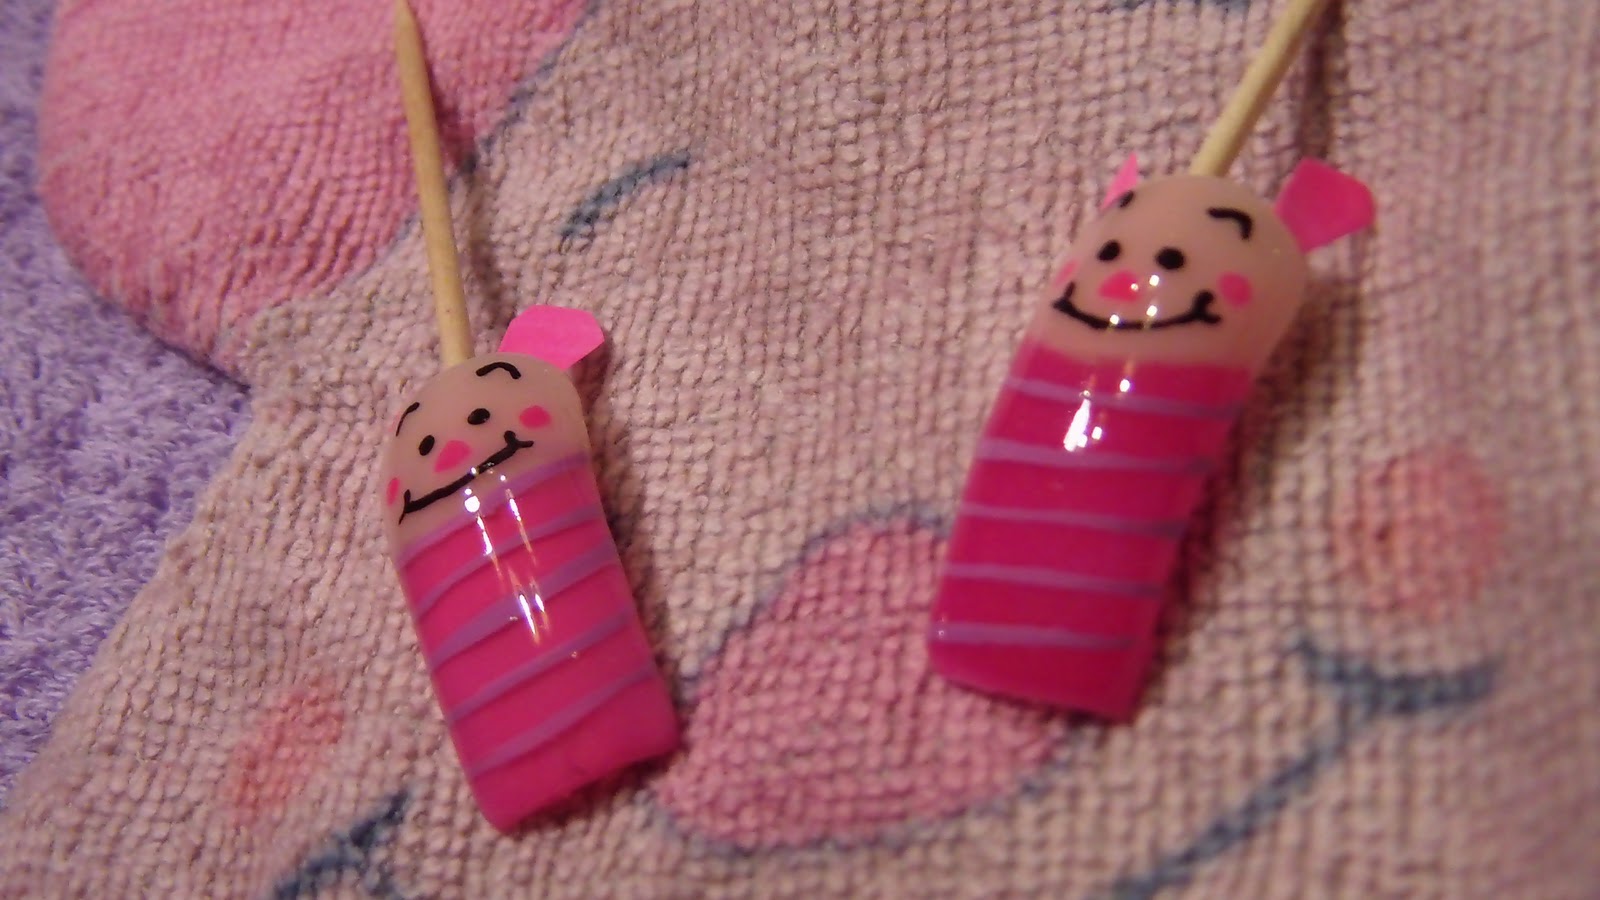
Cute piglet nail art

How to make "Piglet" with acrylic l&p and paint *l&p=liquid and powder*
___________________________________________________________


As I was bathing my two kids, I took a washcloth from the shelf and looked at it, and I had the bright idea to make it into a nail art design.


So first, take any pink acrylic colored powder that you have that comes close to Piglet's body and start forming your free edge.
I used a neon pink powder and a neon glitter that I mixed with clear powder.
The one on the left is the neon pink powder, and the one on the right is the neon glitter.


Then encapsulate with clear acrylic, and when that is fully dry, file and buff your nail to the desired shape.
With black acrylic paint and a dotting tool, I formed Piglet's eyes, eyebrows and mouth.
With China Glaze's "Pool Party" I made his little cheecks.


Then I mixed a purple acrylic paint with white, to make lighter shade of purple for the stripes on Piglet's belly.
I let that dry completely and put a coat of NSI Glaze 'n Go on it and let it cure for about 2-3 minutes.


Next time I'll try and remember to take pictures in between so I can give you a better step by step, but I think you know what I'm talking about when you see the video.

Products used:
NSI Attraction Liquid
Nailbed: NSI purely pink masque
Free edge: Neon pink powder : no brand
Neon pink glitter : no brand
NSI attraction: totaly clear
Face: Oumaxi black acrylic paint, dotting tool, China Glaze's "pool party"
Body: Oumaxi purple and white acrylic paint, mixed together and a striping brush
Topcoat: NSI Glaze 'n go
Uv light: 5Second travel lamp